
본인은 0번을 BS로 설정했기 때문에 결과가 0이 나오면 AP이다.
현제의 큐 상태를 확인하기 위한 소스의 수정은 크게 2가지로 나뉜다.
먼저 ns-2.33/queue/Queue.h에서 dequeue로 현재 패킷이 이벤트가 일어날 때의 큐 사이즈를 불러온다.
virtual Packet* enque(Packet* p) { // Returns previous tail
Packet* pt = tail_;
if (!tail_) head_= tail_= p;
else {
tail_->next_= p;
tail_= p;
}
tail_->next_= 0;
++len_;
++num_p_; //들어오는 패킷에 시퀀스 넘버를 할당하여 deq와 비교할 때 썼다.
hdr_cmn::access(p)->num_en=num_p_; //packet.h에 접근하여 현제 이벤트의 패킷 정보를 변경한다.
bytes_ += hdr_cmn::access(p)->size();
hdr_cmn::access(p)->enq_q_len_=len_; // 현제 큐 길이를 저장한다.
return pt;
}
virtual Packet* deque() {
if (!head_) return 0;
Packet* p = head_;
head_= p->next_; // 0 if p == tail_
if (p == tail_) head_= tail_= 0;
--len_;
bytes_ -= hdr_cmn::access(p)->size();
hdr_cmn::access(p)->deq_q_len_=len_; //실제 사용한 변수 여러 변수를 선언하고 사용하지 않더라도 남겨 둔 이유는
차 후 다른 실험들을 할 때 사용하기 위해서이다. 주석처릴 잘해야하는데 잘 안된다.
return p;
ns-2.33/common/packet.h의 struct hdr_cmn에 필요한 변수를 넣는다.
나는
int enq_q_len_;
int deq_q_len_;
int num_en;
세 변수를 넣어두었다.
ns-2.33/mac/mac-802_11.cc에서 사용하기 위해선 다음과 같은 절차를 수행한다.
struct hdr_cmn *hdr = HDR_CMN(p);
hdr->deq_q_len_
이렇게 하면 원하는 패킷의 정보를 얻을 수 있다.
'Network > Ns2_simulation' 카테고리의 다른 글
| TCP와 UDP (0) | 2009.02.18 |
|---|---|
| 거지같은... 논문들... ㅡㅡㅋ 믿을게 없다. ns2 802.11b udp 실험에서.. (1) | 2009.02.09 |
| Node 30개인 경우 CWmin 8 CWmax8의 결과와 재전송의 변화에 따른 결과 (0) | 2009.01.21 |
이 결과는 노드가 10개인 경우에서이다.
하지만 TCP의 경우 불공평성은 50개의 노드에서 0.7대로 떨어지는 것을 확인 하였다.
구간별 실험이 더 필요하지만..
예상은 TCP가 더 많은 불공평성이 발생할 것이다였는데.
의외의 결과였다.
TCP의 성질상.. 불공평성은 더 커져야 하것만....
일단 문제의 핵심을 살펴보기 위해,
IFQ와 MAC의 손실률 알고리즘의 적용 상태를 각각 내가 정의한 trace파일로 만들어 출력해 볼 생각이다.
다음은 결과 파일이다.
 tcp_test_and_7-7.xls
'Network > Ns2_simulation' 카테고리의 다른 글
| ns2 802.11 MAC에서 현제 큐의 size를 알 수 있는 방법. (0) | 2009.02.18 |
|---|---|
| 거지같은... 논문들... ㅡㅡㅋ 믿을게 없다. ns2 802.11b udp 실험에서.. (1) | 2009.02.09 |
| Node 30개인 경우 CWmin 8 CWmax8의 결과와 재전송의 변화에 따른 결과 (0) | 2009.01.21 |

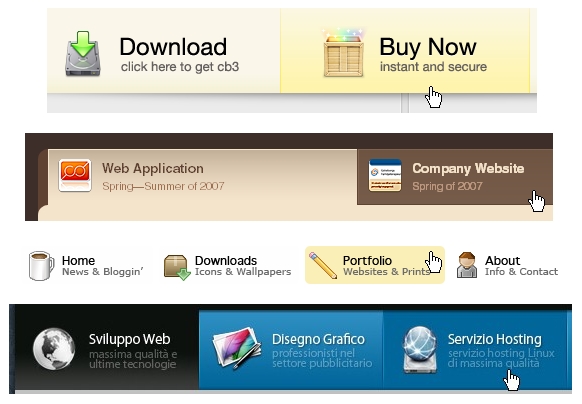
해외 2009년 온라인 웹 디자인 트랜드를 보니.. 일단 큰 그림과 생동감 넘치는 그래픽, 다양한 텍스트 활용이 전체적인 주류를 이루고 있으며
뚜렷한 인터페이스와 선명한 디자인 그리고 회전식으로 돌아가는 네비게이션 및 적절한 동영상의 배치가 부류를 이루는듯 싶다.
less..
사실.. 국내나 해외나 온라인 쇼핑몰에서 웹 디자인은 판매하는 상품에 맞는 적절한 레이아웃과 소비자들의 편안한 시각적 접근 그리고 아기자기하게 사용되는 디자인적 요소에 맞춰 주문에서 결제까지 쇼핑 동선의 흐름을 편안하게 유도하는 것이 웹 디자인의 핵심이라고 볼 수 있다.
국내에도 괜찮은 온라인 쇼핑몰 웹 디자인은 많으나 찾기가 힘들고, 쇼핑몰 디자인만 따로 모아둔 곳이 없기 때문에 정보를 얻기가 힘들다.
평소 괜찮다고 생각했던 국내 쇼핑몰중 디자인이 독특하거나 심플한 곳이 있다면.. 댓글을 통해 주소를 남겨 주셨으면 좋겠습니다. 정리해서 소개해 볼까 합니다.
1.웹 디자인의 전체적인 레이아웃
쇼 핑몰에서 전체적인 레이아웃은 한번 방문한 방문자에게 오래도록 기억된다고 하여 그만큼 신중하게 접근하고 구성한다. 웹 사이트의 전체적인 레이아웃은 디자인을 잡을때 가장 많은 시간이 걸리고, 특히 판매하는 상품과 어울리는지도 잘 따져봐야 한다.
2009년 웹 디자인의 전체적인 레이아웃은 혁신적이고 창조적인 디자인과 새로운 접근 방식인듯 싶다.


2. 하나의 페이지에서 가능한 레이아웃
한마디로 메인에서 모든 기능들을 처리 할 수 있는 레이아웃 디자인이다. 방문자들이 페이지를 넘기는데 걸리는 시간을 최단으로 단축하겠다는 것이다.
온라인이든 오프라인이든 쇼핑에선 손의 위치와 역활은 매우 중요하게 강조되고 있다. 온라인 쇼핑에서 마우스 가운데 바퀴의 활용과 마우스의 클릭수가 매출에 영향을 끼친다는 연구결과도 있다.
단점은 이런 방법들이 아직은 익숙하지 않다는데 있다.


3. 웹 사이트를 쉽게 알릴 수 있는 대표 문구 메인 배치
쇼 핑몰에서 얻고자 하는 정보를 간단한 픽토그램(아이콘)이나 텍스트를 통해 메인 전면에 배치한 레이아웃이다. 눈여겨 볼것은 2009년 웹사이트 공간 활용 추세가 '가로 1000픽셀 세로 850픽셀'이라고 하는데 좁은 공간에 효율적으로 문구와 그림들을 배치하였다.


4. 일러스트 및 뚜렷하고 화려한 그래픽
뚜렷하고 역동적인 일러스트는 방문자 기억에 선명하게 남는다. 그 표현기법은 다양하다. 수채화나 3D, 일러스트, 빈티지, 예술 작품등을 배경과 조화롭게 배치시킨다. 쇼핑몰에서 고객들과 쌍방향 소통을 위해 많이 사용될듯 싶다.


5. 더욱더 늘어나는 흰색 바탕 공간 활용
웹 사이트 디자인에서 일반적으로 화면의 바탕은 흰색으로 처리하고, 글자는 검은색으로 처리 한다. 사람들의 시각은 오랫동안 인쇄물에 길들여져 왔다. 수천년동안 종이는 흰색, 글자는 검은색이라는 기준에서 여백을 넓직하게 두는건 보편적이다.
또한 흰색이 많으면 시각적인 피로도를 줄일 수 있을뿐만 아니라 상품의 신뢰도나 편안함을 줄 수 있다고 한다.

6. 소셜 디자인적 요소
소셜 디자인은 다른 설명보다 "소셜 디자인을 할 때 주목해야 할 16가지" 이 글을 읽어보는게 빠른다.
1. 인간은 아주 복잡한 사회적 동물이라는 사실.
2. 기술로는 사람들을 빠르게 변화시킬 수 없다는 사실.
3. 인간은 좀 더 효율적으로 소통할 수 있는 새로운 방법을 끊임없이 탐구한다는 사실.
4. 인터넷의 가장 큰 사용목적은 바로 소통이라는 사실.
5. 한 사람은 자신의 삶의 다양한 영역에서 각기 다른 역할을 한다는 사실.
6. 동질성을 갖는 사람들과 연결되는 성향을 가지고 있다는 사실.
7. 동질성이라는 건 각자가 처한 상황과 목표에 따라 결정된다는 사실.
8. 동질성이 강해지면 집단적으로 생각하게 된다는 사실.
9. 시간이 흐르면서 그룹 내에서는 예측할 수 없는 활동이 일어난다는 사실.
10. 각 개인은 그룹안에 속했을때 혼자일때와는 다르게 행동한다는 사실.
11. 알고지내는 사이의 사람들끼리 행동에 큰 영향을 끼친다는 사실.
12. 전체 큰 사회내에서가 아니라 그가 속한 작은 그룹 내의 다른 사람들과 자신을 비교한다는 사실.
13. 사람들은 대부분 합리적이지만, 자신의 이해관계가 걸려있을때는 합리적이지 않을 수 있다는 사실.
14. 사람들은 확실한 판단을 내릴 수 없을때 사회적으로 연결된 다른 사람들의 도움에 의지한다는 사실.
15. 잘 모르는 사실에 대해서는 선입견을 가지고 있다는 사실.
16. 인생은 결정적이지 않기 때문에 사람들이 어떻게 행동할지 예측할 수 없다.


7. 눈에 쉽게 들어오는 메뉴 구성
웹 디자인을 할 때 사용자들의 동선을 고려한 인터페이스와 메뉴 디자인 함께 고려해야 한다. 쇼핑몰에서 메뉴 구성은 무엇보다 중요하다.


8. 동적인 탭
탭은 상품의 분류를 나눌때 효과적으로 사용될 수 있다. 작은 탭 디자인은 영화에서 치자면 훌륭한 조연들이다. 무심코 지날치수도 있는 작은 탭들을 어떻게 잘 살리느냐에 따라 퀄리티 차이가 난다.


--
본 포스팅은 http://www.x2soft.co.kr/ 에 동시 기재됩니다.
'Web > Info' 카테고리의 다른 글
| 애플릿이란? [출처] 애플릿이란?|작성자 희정 (0) | 2009.01.12 |
|---|---|
| 서블릿 (0) | 2009.01.12 |
| HTML, ASP, PHP, JAVASC (지식카페 퍼옴) (0) | 2009.01.12 |
| Servlet(http://kmh.ync.ac.kr/encycl/terms/termsJ/jsp2.htm) (0) | 2009.01.12 |
| 무료 웹호스팅 000webhost.com (1.5GB 용량, 100GB 트래픽) 웹사이트 소개 & 활용 (0) | 2009.01.12 |
일반적인 환경에서 rts, cts를 사용하는 환경에서 조차..
1:1 환경의 UDP는 최대 4.9Mbps영역을 벗어나지 못한다..
걍.... 그렇다.
하지만 현재 나온 논문들의 결과들을 보았을 때, 7Mbps를 상회하는 결과들이 보인다.
나쁜넘들.. 오늘 그 이유를 알았다.
완전한 11Mbps만을 위한 환경을 구축하고선.. 테스트 한거다.
실제 완벽하게 모든 파라미터값들을 언급한 논문은 없었다.
그렇다만, 내가 알아낸 방법에 의해..
UDP가 최대 8Mbps에 근접해지는 방법을 서술하겠다.
아래는 실험 결과~
하나의 무선 단말기에 10개의 단말기가 전송을 하였을 경우..
AP는 걍 이렇게 만들어 짐다~
10 : 10 _ 31 _ 1023 up: total_byte1 7.80553 down: total_byte2 0 fairness_index: inf total = 7.80553
무선 파라미터 값이다.
#=================================================================
Mac/802_11 set dataRate_ 11.0e6 ;# 11Mbps
Mac/802_11 set basicRate_ 11.0e6 ;# 1Mbps
#본 실험은 거리에 따른 전송의 영향을 무시한다. 또한 1Mbps 영역의 전송 또한 무시한다.
이 파라미터 값은 상당한 영향을 미친다.
Mac/802_11 set CWMin_ 31
Mac/802_11 set CWMax_ 1023
Mac/802_11 set SlotTime_ 0.000020 ;# 20us
Mac/802_11 set SIFS_ 0.000010 ;# 10us
Mac/802_11 set PreambleLength_ 72 ;#long 144 bit, short 72
#최적의 성능을 위해 보시다시피 short PreambleLength_를 72로 할당한다. 성능이 덕분에 좀 높게 나온다.
Mac/802_11 set PLCPHeaderLength_ 48 ;# 48 bits
Mac/802_11 set PLCPDataRate_ 11.0e6 ;# 1Mbps
#이 부분 또한 엄청나게 중요한 부분이다.
보충 설명을 하자면
<802.11b의 물리 계층은 비트 동기 및 프레임 동기를 설정하고 현재의 무선채널에 대한 idle 상태와 busy상태를 MAC에 보고 하는 clear cchannel assessment(CCA)기능을 수행함으로써 하나의 무선채널을 여러 단말이 공유하는 CSMA/CA MAC이 동작할 수 있도록 하고 있다.
이를 위하여 128비트의 비트 동기용 프리앰블 영역과 48비트의 PLCP(Physical Layer Convergence Protocol)헤더로 구성된 물리 계층용 헤더가 별도로 사용되고 있다. 주의할 사항은 PLCP영역은 기존 저속 무선 LAN과의 호환을 위하여 1Mbps로 전송된다는 점이다.>
참고사항: http://book.naver.com/bookdb/book_detail.php?bid=2620611&menu=dview&dencrt=xQFdkdw8Y5VjlEneeHdFREZKYlNGclZheUVqUGhiSmx1TE1TR3FTYi9CZGdFZng4S28yMHg3eHBjQ1BpcmYvYg==&query=plcp&term=plcp#middle_tab
Mac/802_11 set RTSThreshold_ 0 ;# bytes
#이것도 매우 웃긴다.. 구글의 많은 블러그에 펌질되어 있던 결과는 다음을 참조하면..
참조: http://www.ece.rice.edu/~jpr/ns/docs/ns-802_11b.html
RTS를 사용하지 않을경우가 처리량이 더 높다. 실험결과에서는 노드가 증가할 수록 UDP는 RTS를 사용할 경우 더 높은 처리량을 나타낸다.
Mac/802_11 set ShortRetryLimit_ 7 ;# retransmittions
Mac/802_11 set LongRetryLimit_ 4 ;# retransmissions
Mac/802_11 set bugFix_timer_ true; # fix for when RTS/CTS not used
# details at http://www.dei.unipd.it/wdyn/?IDsezione=2435
Mac/802_11 set BeaconInterval_ 0.1 ;# 100ms
Mac/802_11 set ScanType_ PASSIVE
Mac/802_11 set ProbeDelay_ 0.0001 ;# 0.1 ms
Mac/802_11 set MaxChannelTime_ 0.011 ;# 11 ms
Mac/802_11 set MinChannelTime_ 0.005 ; # 5 ms
Mac/802_11 set ChannelTime_ 0.12 ;# 120 ms
#=================================================================
Phy/WirelessPhy set CPThresh_ 10.0
Phy/WirelessPhy set CSThresh_ 1.559e-11
Phy/WirelessPhy set RXThresh_ 3.652e-10
Phy/WirelessPhy set bandwidth_ 11e6
Phy/WirelessPhy set Pt_ 0.28183815
Phy/WirelessPhy set freq_ 914e+6
Phy/WirelessPhy set L_ 1.0
#=================================================================
이 파라미터 값들은 아직도 완벽한 11Mbps를 위한 구성은 아니다.
안테나 반경이라던지 파워 등은 시중의 정확한 기본 값을 설정하기엔 내가 알고 있는 지식이 부족하기 때문이다.
하지만 여러 논문들의 환경들을 테스트 한 결과, 무선피지컬 레이어는 큰 영향을 미치지 않는다. 물론 에드혹이나 핸드오프에서는 큰 영향을 줄 수 있을지도 모르겠다.
차후 실험으로 유선망과 결합한 실험에서의 불공평성을 할 것이며
불공평성 실험후, 구현 알고리즘을 적용할 것이다.
UDP 실험이 끝나고 나면 TCP 실험으로 바로 넘어가 UDP와 동일한 실험들을 할 계획이다.
결과는 같이 정리해 놓도록 하겠다.
훗.. 안올리려다.. 고생할 이들을 위해... 소스 업~
 sim.tar.gz
'Network > Ns2_simulation' 카테고리의 다른 글
| ns2 802.11 MAC에서 현제 큐의 size를 알 수 있는 방법. (0) | 2009.02.18 |
|---|---|
| TCP와 UDP (0) | 2009.02.18 |
| Node 30개인 경우 CWmin 8 CWmax8의 결과와 재전송의 변화에 따른 결과 (0) | 2009.01.21 |
Note: A few answers come from the discussion in Ns2 mail list and are proved
to be effective.

----------------------------------------------------------------------------
Question 1:

Scheduler:: Event UID not valid!

Answer:

Each event in NS2 has a unique UID. The scheduler toggles the UID twice,
once during dispatching and once during scheduling. Thus, the event has a
positive UID after being scheduled and a negative one before being scheduled.
If the event has been scheduled but not dispatched, then it will have a
positive UID and cannot be scheduled again.

In implementing a new protocol, this error can happen in two cases:

1. You are using timers. When a timer is scheduled again without the
previous schedule expiring - Trace which timer is scheduled and when it
will expire.

2. You are dealing with packets. A packet is also a kind of event to be
scheduled and a UID is associated with it. When you create a
copy or alloc again before freeing it, due to the same packet with a positive
UID, it cannot be scheduled again.
-----------------------------------------------------------------------------

Question 2:

What is the role of GOD?

Answer:

GOD, called general operations director, is an object which is aware of the
whole mobile wireless network topology during the period of simulation.

GOD is used to store global information about the states of the simulated mobile
wireless network, i. e. , GoD is an omniscient observer, but the global
information GOD owns should not be totally available to any nodes in the
simulation, a node can obtain its partial information when needed.

Currently, GOD is only used to store an array of the shortest number of hops
required to reach from one node to another. GOD does not calculate them
on the fly during the simulation, since it can be quite time consuming.
The information is loaded into GOD from the movement pattern file where
the lines similar to

$ns_ at 666.66 "$god_ set-dist 10 20 2"

are used to load GOD with the information that the shortest path
between node 10 and node 20 is changed to 2 hops at time 666.66.
------------------------------------------------------------------------------

Question 3:

How to debug my extension to ns2?

Answer:

There are two levels to debug:

1. C++ level:

(1) To enable debug information in ns as follows:

in your ns-allinone directory, edit the install file.

In a section which includes "# Build Tcl8.3.2", you need to add the option

--enable-symbols, such that:
./configure --enable-gcc --disable-shared --prefix=$CUR_PATH || ....

becomes:
./configure --enable-gcc --enable-symbols --disable-shared --prefix=$CUR_PATH || ....

In another section which includes "# Build tclcl",  you need to add --enable-debug
to your configure line, such that:

./configure ||  ...

becomes

./configure --enable-debug || ...

(2) To enter your ns-allinone/ns directory, and open your Makefile.in. You need to
change the line

CFLAGS  = $(CCOPT) $(DEFINE)

to

CFLAGS  = -g $(CCOPT) $(DEFINE)

(3) To go back to ns-allinone directory and type ./install

(4)  the C++ debug with gdb
    . gdb ns
    .(gdb) set args myscript.tcl
    .(gdb) b MyClass::myfunction
      # This line set breakpoint
    .run

2. Tcl Level

You need to find a software which is called tcl-debug.

(1) To place tcl-debug-2.0/ parallel to ns-2.26/
(2) cd ns-2.26
    ./configure --enable-debug --with-tcldebug and examine Makefile to ensure tcl-debug
options enabled.
(3) make clean; make; make install

(4) Add breakpts for tcl-debug
Add "debug 1" (it's one not 'L') into your script file where you want to
debug.
------------------------------------------------------------------------------------

Question 4:

Difference between Thresholds in wireless-phy.cc

Answer:

(1) RXThreshold: If a packet reaches a node with a power level that is below
RxThrehold, the node will receive the packet with error (i.e. will not be able
to read the packet), but will understand that a packet is being transmitted for
[0,T] sec.

(2) CSThreshold: If a packet reaches a node with a power level that is below
CSThresh_ , the node will not be able to understand that a packet is being
transmitted for [0,T] sec; i.e. it will perceive the channel to be idle.

(3) CPThreshold: Let a packet 'A' is being received by a node during [0,T] sec. If
another packet ('B') transmission begins during [0,T] so that 'B' reaches the
node with a power that is CPThreshold below the received power of packet 'A'
(in dB scale), packet 'A' will survive (i.e. the node will be able to read
packet 'A'). Otherwise, packet 'A' will "collide" with packet 'B' (so
that the node will not be able to read either of the packets).
-------------------------------------------------------------------------------------

Question 5:

What does it mean when ns gives the message "scheduler going
backwards from 73.9587457845 to -1417846817.3257839 ?

Answer:

Most likely, one of the events gave rise to some other event in "past". If you
know how discrete event simulators work, this will be clear to you. However,
it seems that this occurred due to an overflow in calculating the timing for a
future event somewhere.
------------------------------------------------------------------------------------

Question 6:

How to set up the wireless bandwidth (such as 802.11 a,b,g) in NS2?

Answer:

In ns2.26 and ns2.27, you can change (basicRate_ and dataRate_ ):

Mac/802_11 set basicRate_ 1Mb
Mac/802_11 set dataRate_  11Mb

in your tcl script.

FHSS (IEEE802.11)
   Mac/802_11 set SlotTime_          0.000050        ;# 50us
   Mac/802_11 set SIFS_              0.000028        ;# 28us
   Mac/802_11 set PreambleLength_    0               ;# no preamble
   Mac/802_11 set PLCPHeaderLength_  128             ;# 128 bits
   Mac/802_11 set PLCPDataRate_      1.0e6           ;# 1Mbps
   Mac/802_11 set dataRate_          1.0e6           ;# 11Mbps
   Mac/802_11 set basicRate_         1.0e6           ;# 1Mbps

DSSS (IEEE802.11b)
   Mac/802_11 set SlotTime_          0.000020        ;# 20us
   Mac/802_11 set SIFS_              0.000010        ;# 10us
   Mac/802_11 set PreambleLength_    144             ;# 144 bit
   Mac/802_11 set PLCPHeaderLength_  48              ;# 48 bits
   Mac/802_11 set PLCPDataRate_      1.0e6           ;# 1Mbps
   Mac/802_11 set dataRate_          11.0e6          ;# 11Mbps
   Mac/802_11 set basicRate_         1.0e6           ;# 1Mbps

Note:

-if using the short preamble option: you can change the line as:
Mac/802_11 set PreambleLength_ 72

-  # frequency is 2.4 GHz
   Phy/WirelessPhy set freq_ 2.4e+9
   # transmit power
   Phy/WirelessPhy set Pt_ 3.3962527e-2
   # Receive sensitivity.
   Phy/WirelessPhy set RXThresh_ 6.309573e-12
   Phy/WirelessPhy set CSThresh_ 6.309573e-12

Note that the radio range that results from this configuration may or may
not coincide with open field tests. If you want setup a specific range,
use the program ~/indep-utils/propagation/threshold.cc to obtain the
desired RXThresh_ (rx sensitivity) based on the above frequency, transmit
power and your desired range.


802.11g:

#define DSSS_CWMin			15
#define DSSS_CWMax			1023
#define DSSS_SlotTime		0.000009
#define DSSS_CCATime 		0.000003
#define DSSS_RxTxTurnaroundTime	0.000002
#define DSSS_SIFSTime		0.000016
#define DSSS_PreambleLength	 96
#define DSSS_PLCPHeaderLength	40
#define DSSS_PLCPDataRate		6.0e6	// 6Mbps
#define DSSS_MaxPropagationDelay     0.0000005	// 0.5us


Note: bandwidth is different with achievable throughput.

- In NS ACK are always sent at 1Mbps
- NS use always the long PLCP preamble format sent at 1Mbps
- by default NS uses RTS/CTS handshake
- Packet's size has also an impact in the % of overhead.

All this factor can  bound the achievable throughput

-----------------------------------------------------------------------------------
Question 7:

When do we need to "make clean; make depend; make" in ns2?

Answer:


A trick:

- after making the changes in any tcl file I go into ns-lib.tcl, and
make a small change e.g delete a full stop in a comment or add my on
comment anywhere (note that this change should be in the cmmented area
not the actual code).
- save the ns-lib.tcl file.
- run "make" only.

In this way I find that all the changes in all other tcl files take
effect.

the same trick whenever u change a .h  file only  i.e.
make some  trivial change in the corresponding  .cc file

------------------------------------------------------------------------------------

Question 8:

How to deal with Very large trace files?

Answer:

(1) Don't trace-all

(2) To Turn off some unused packet header

(3) Two simple solutions using "pipe":
    . To use tool (i.e awk) to filter only interesting events

    set tr [open "| awk -f filter.awk >out.tr" w]
    $ns trace-all $tr

    .if You are not interested in traces and only results (average,
variation, distribution, count etc.)

    set tr [open "| awk -f my_measure_tool.awk >my_results.txt" w]
    $ns trace-all $tr
(4) To try other compression skill, such as
You may reduce the size of the trace file by using the
sed command on solaris machines.
For example, if all you need is just the RTR and AGT
trace lines, you may remove the MAC trace using
cat tracefile.tr | sed -e "/MAC/d" >
smallertracefile.tr

------------------------------------------------------------------------------------

Question 9:

How to disable RTS/CTS?

Answer:

(1) If you are using ns-2.27, include the line:

Mac/802_11 set RTSThreshold_ 3000

to your Tcl scrip

(2) If you are using older version, you need to do as below:

To change the value in mac_802-11.h (a macro), then make depend, make

In a similar way, you can change cw_, ShortRetryLimit_, LongRetryLimit_  etc.

-----------------------------------------------------------------------------------

Question 10:

What is size of voice or data packet size used to simulate in a wireless LAN?

Answer:

voip:  150bytes
FTP: vaiable packet size, 150-1500Bytes
HDTV or SDTV: 1500bytes
-----------------------------------------------------------------------------------

Question 11:

How to run a set of similar experiments together?

Answer:

Method 1: You can specify an input parameter to the simulation script. Then, based on the
value of your input, you can name your tracefiles differently. You could create,
for instance, the .sh script on the top of the NS simulator to launch consequently
all the simulations.

Method 2: Type your tcl scipts sequentially, do remember to set different trace files

$>ns code1.tcl
.....Starting Simulation

ns code2.tcl     #just type in your commands here sequentially
ns code3.tcl

Method 3: Try doing this in TCL level using for loop. For example, look at parts
of the code below:

proc runsim { num_cbr i }
   set CBRrate [expr $i*1000000]
   ...
   ...
   set traffic [new Application/Traffic/CBR]
   $traffic set rate_ $CBRrate
   ...
   ...

   xxx
}

for {set i 1} {$i < 10} {incr i 1} {
   runsim $i
}

You can see that your main code is in the runsim procedure, but the
main control is in the for loop below -- which increases the CBR rate
from 1Mbps to 10Mbps using 1Mbps increment. At the end of the runsim
procedure, you would see I put xxx there. It's where you can make a
calculation and output to your output file (append line by line after
each run); which means you have all the results in the same file ready
to be plotted.

Method 4:just write another script that passes a command line parameter
to your ns script that is the CBR rate
E.g

In your ns script put
if { $argc == 1 } {
    set cbr [lindex $argv 0]
    puts "CBR: $cbr"
}
<insert the rest of your script>

Then in the running script do something like

set max 20
for { set cbr 1 } { $cbr <= $max } { set cbr [expr $cbr + 1] } {
    puts "Running test CBR=$cbr"
    exec ns myscript.tcl $cbr
}
-----------------------------------------------------------------------

Question 12:

Rx Power or carrier sense Threshold setting?

Answer:

- enter indep-utils/propagation directory
- g++ -lm -o threshold threshold.cc
- ./threshold

this tool can help you calculate
------------------------------------------------------------------------

Question 13:

How to pass an argument from tcl to c++?

Answer:

method 1: bind the variables you want to share
method 2: For example:

 Tcl& tcl = Tcl::instance();
 tcl.eval("$cbr set packet_size_");
 char* var_temp = tcl.result();

--------------------------------------------------------------------------

Question 14:

How to post analyze the trace file?

ANswer:

The below is a awk script to analyze several parameters (average e-2-e delay,
pdf, normalised routing load and dropped packets,..) for aodv old trace file
format.

BEGIN {

droppedAODVPackets=0;
sends=0;
recvs=0;

# highest packet id can be checked in the trace file for an approximate value
highest_packet_id =500000;
sum=0;
AODV_Adv=0;
}

{
   action = $1;
   time = $2;
   node_1 = $3;
   node_2 = $4;
   src = $5;


# For stand alone ad hoc trace files:
#   if ( packet_id > highest_packet_id ) highest_packet_id = packet_id;

# For wired- and cireless trace files.

      if ($5 =="cbr") {
      packet_id = $12;
      } else {
      packet_id = $6;
      }


#============= CALCULATE DELAY   =========================================
   # getting start time is not a problem, provided you're not starting
   # traffic at 0.0.
   # could test for sending node_1_address or flow_id here.

 if ( start_time[packet_id] == 0 )  start_time[packet_id] = time;

   # only useful for small unicast where packet_id doesn't wrap.
   # checking receive means avoiding recording drops
   if ( action != "d" ) {
      if ( action == "r" ) {
       # could test for receiving node_2_address or flow_id here.
         end_time[packet_id] = time;
   }
   } else {
      end_time[packet_id] = -1;
   }
#============= CALCULATE PACKET DELIVERY FRACTION============================
# $3 = source node id , here I have 4 source nodes and start my analysis after
490 seconds of simulation  (when traffic started)
if (( $1 == "s") &&  ( $7 == "cbr" ) && ( $4
=="AGT" ) && ( ( $3== "_5_" )   || ( $3==
"_6_" )   ||  ($3=="_7_")  ||  ($3=="_8_")
)&& ($2 > 490.00 )    ) {
      sends++;}


# $4 = destination node in wired segment of network. if you simulate ad hoc only
scenario the change $4 to $3 and %5 to $7.
if ( ( $1 == "r") &&  ( $5 == "cbr" ) && (
$4 == "0" ) && ($2 >  490.00 ) ) {
      recvs++;}

pdf = (recvs/sends)*100;


#==================== ADVERTISEMENTS ==================

if ( (($1=="f")  || ($1=="s") ) && ($4 ==
"RTR") && ($7 =="AODV" ) && ($2 > 490.00
) ) {
AODV_Adv++;
}

#============= DROPPED AODV PACKETS ========================================
if ( ($1 == "D") && ($7=="cbr")  && ($2 >
490.00 ) ){
        droppedAODVBytes=droppedAODVBytes+$8 ;
        droppedAODVPackets=droppedAODVPackets+1;
    }


}
END {
    for ( packet_id = 0; packet_id <= highest_packet_id; packet_id++ ) {
       start = start_time[packet_id];
       end = end_time[packet_id];
       packet_duration = end - start;
   if ( start < end ) sum= packet_duration+sum;
}
delay=sum/recvs;


printf(" Average e-e delay: \t %f \n", delay);

printf(" normalised routing load \t %f \n ", AODV_Adv/recvs);

printf("No. of packets sent = %d \n", sends);
printf(" No. of packets received = %d \n", recvs);
printf(" Pdf (100%) = %f \n \n", pdf);

printf("No. of dropped data (packets) = %d \n ",droppedAODVPackets);
printf("No. of dropped data (bytes) = %d \n \n ",droppedAODVBytes);
printf("No. of aodv advertisements = %f \n ",AODV_Adv);
}

------------------------------------------------------------------------------------

Question 15:

How to disable the routing when you wanna measure MAC layer performance?

Answer:

you can use DumbAgent as below:

$ns_ node-config  \
    -adhocRouting DumbAgent\
    -llType $val(ll) \
    -macType $val(mac) \
    -ifqType $val(ifq) \
    -ifqLen $val(ifqlen) \
    -antType $val(ant) \
    -propType $val(prop) \
    -phyType $val(netif) \
    -topoInstance $topo \
    -agentTrace ON \
    -routerTrace ON \
    -macTrace ON \
    -movementTrace OFF \
    -channel [new $val(chan)]

---------------------------------------------------------------------------------------

Question 16:

How to use parameters in command line?

Answer:

For example, if you try to pass the number of nodes as a parameter to
your script such as my_script.tcl 10

- use the following in your tcl file

 set num_nodes [lindex $argv 0]

- then use the num_nodes variable wherever you wanna
--------------------------------------------------------------------------------------

Question 17:

How to debug by printf?

Answer:

method 1: printf("DEBUG TEST TEST\n"); don't use \r

and you may put a fflush(NULL); statement after prinf, then the result will
get printed immediately.

method 2:

char out[100];
Tcl& tcl = Tcl::instance();
sprintf(out, "puts \"DEBUG TEST TEST\"");
tcl.eval(out);
-------------------------------------------------------------------------------------
'Network > Ns2_Lecture' 카테고리의 다른 글
| Analysis of 802.11 MAC code in NS-2 (0) | 2009.02.05 |
|---|---|
| [통신관련] XP인터넷 최적화 총정리 (MTU 측정에서 변경까지) (0) | 2009.01.18 |
| Tcl 명령어 (0) | 2009.01.18 |
| 라우팅 모듈 (0) | 2009.01.18 |
| The Network Simulator - ns-2 (0) | 2009.01.18 |
⑴FHSS (Frequency Hopping Spread Spectrum) - 주파수 도약 확산 스펙트럼 방식
-무선 통신에서 주파수를 고정하지 않고 시간에 따라 변화시켜 송신하는 스펙트럼 확산 방식
즉 송신측과 수신측에서 주파수 위치를 변화시켜 통신하는 방식
이방식을 표준화한 IEEE802.11에 의하면 송신하는 데이터는 주파수를 편이 변조시켜 도약
패턴으로 주파수를 도약, 외관상 주파수 대역폭을 넓혀 송신하고 반대로 수신한 신호는 복조과정을
거쳐 데이터를 검출한다. 저농과정에 어떤 간섭파가 존재하는 경우 간섭파에 반사된 송신파는
폐기되어 재전송되고, 반사되지 않으면 영향을 받지 않는다.
⑵DSSS (Direct Sequence Spread Spectrum) - 직접 시퀀스 확산 스펙트럼 방식
- 하나의 신호 심볼을 일정한 시퀀스로 확산시켜 통신하는 방식
의사 잡음 시퀀스 (pseudo-random noise sequence)에 원래의 신호를 입력시키면, 주파수당
전력 밀도가 낮아진 확산 대역 스펙트럼 신호를 얻을 수 있다. 수신 측에서도 동일한 시퀀스의
의사 잡음 시퀀스를 이용하면 원신호를 재생할 수 있으며, 다수의 사용자가 사용할 수도 있다.
변조의 효율성이 좋고, 신호의 동기가 빠르며, 낮아진 전력 밀도로 대역 내 간섭이 적은 장접이
있어 부호 분할 다중 저속 (CDMA)에 사용되고 있다. 지그비도 이방식을 쓴다.
DSSS
IEEE 802.15.4 물리계층은 DSSS(Digital Sequence Spread Spectrum)을 이용하여 무선으로 데이터를 보낸다. DSSS는 양쪽 모두가 알고 있는 슈도랜덤(pseudo random) 값인 +1이나 -1을 데이터에 곱해서 보낸다. 이 시퀀스는 실제 반복되는 비트 보다 훨씬 길이가 길어진다(높은 주파수가 된다). 수신측에서 신호를 얻기 위해서는 단순하게 슈도랜덤 노이즈를 다시 곱하기만 하면 된다. (1 x 1 = 1, -1x-1=1). 이와 같이 길게 늘인 신호는 전송실패 확률을 줄여주어 더욱 안정적이다. IEEE 802.15.4는 실제적으로 4비트 데이터를 32비트로 구성 된16개 슈도 랜덤 번호로 만든 심볼 중에 하나를 선택한다. 이 심볼은 각각이 서로다른 슈도랜덤 번호 32의비트를 나열된 하나뿐인 시퀀스이다. DSSS는 Bluetooth나 IEEE 802.11에서 사용하는 주파수 호핑(Frequency Hopping)과 비교되는 방법이다. 주파수 호핑은 캐리어 주파수를 이용하여 슈도 랜덤하게 모듈레이션과 디모듈레이션을 한다.
[출처] DSSS & FHSS|작성자 달새
'Network > Ns2_source' 카테고리의 다른 글
| NS2_Reno, cwnd, ip packet size의 11Mbps 무선랜, 100Mbps유선랜 ns2_upstream10/downstream10 (0) | 2009.01.18 |
|---|---|
| NS2_스크립트 up_down_stream2.sh_upstream10/downstream10 (0) | 2009.01.18 |
| NS2_awk-ack_rec_wire_upstream10/downstream10 (0) | 2009.01.18 |
| NS2_awk-ack_rec_wireless_upstream10/downstream10 (0) | 2009.01.18 |
| NS2_awk-ack_send_wire_upstream10/downstream10 (0) | 2009.01.18 |
http://www.winlab.rutgers.edu/~zhibinwu/html/ns2_mac.html
Analysis of 802.11 MAC code in NS-2
[ Back to Network Simulator 2 for Wireless ]0. MAC in ns-2

LAN is within Berkeley Architecture, WLAN cannot create with “newLan” command
Ethernet could be created as a LAN with common bandwidth and delay.
1. The general structure of MAC
related sourcecode: mac.cc, mac.hMAC class is derived from Bi-Connector class.
Local Variables:
- pktTx_
- pktRx_
- Macstate_ :
- index_ : mac address
Basic functions of General MAC class.
- recv (packet, handler)
- This is the entry from upper target (a callback handler is given as a parameter) to send a packet to MAC. After the MAC transmit this packet successfully, it will use this callback handler to inform the upper target that MAC is idle and give another packet if there are packets buffered.
- This is the entry from upper target (a callback handler is given as a parameter) to send a packet to MAC. After the MAC transmit this packet successfully, it will use this callback handler to inform the upper target that MAC is idle and give another packet if there are packets buffered.
- SendUp
- entry for receiving a packet. Sendup is function is directly called by the lower target of MAC, might be "netif" or "phy". And this function directly calls the upper_target. Because the uplink to upper_target does not involve any phsical transmission delay, it does not need any timer and state change here. The question is that when the MAC is in MAC_RECV state? The answer is: The MAC here is supposed to be full-duplex and receive can be happened simultaneously. it does not care about collisions etc. This is a general MAC class
- entry for receiving a packet. Sendup is function is directly called by the lower target of MAC, might be "netif" or "phy". And this function directly calls the upper_target. Because the uplink to upper_target does not involve any phsical transmission delay, it does not need any timer and state change here. The question is that when the MAC is in MAC_RECV state? The answer is: The MAC here is supposed to be full-duplex and receive can be happened simultaneously. it does not care about collisions etc. This is a general MAC class
- SendDown
- used to sending packet down. Called by recv().init a timer for tx, and the timer handler is defined to call resume().
- used to sending packet down. Called by recv().init a timer for tx, and the timer handler is defined to call resume().
- Handler* callback_;
- when MAC is idle, the upper target has to be callback.
- Resume()
- When tx timer out, reset MAC as idle state and callback.
- When tx timer out, reset MAC as idle state and callback.
- Discard
- When a packet has to be drop, the drop_ (NsObject*) of bi-connector class has to be called to handle this, usually drop (p, why) is used. Why is a string of drop reason, in cmu-trace.h. three-character string is defined to describe those reasons in the trace file, such as "BSY", "CBK"....
- When a packet has to be drop, the drop_ (NsObject*) of bi-connector class has to be called to handle this, usually drop (p, why) is used. Why is a string of drop reason, in cmu-trace.h. three-character string is defined to describe those reasons in the trace file, such as "BSY", "CBK"....
2. The 802.11 MAC
it is implemented by CMU. It is a subclass of MAC.related sourcecode : mac-802_11.cc, mac-802_11.h, mac-timer.cc, mac-timer.h
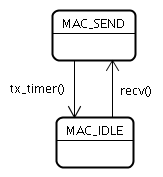
State Machine:
The tx_state and rx_state are two member variables. Although, actually mac cannot transmit and receive at the same time. we still hold two variables for them. The possible state is MAC_SEND, MAC_IDLE, MAC_RECV, MAC_COLL, MAC_RTS, MAC_CTS, MAC_ACK.
Local Variables:
- pktTx_ (inherited from Mac class):
- pktRx_(inherited from Mac class):
- pktCtrl_
- pktRTS_
Basic functions:
- recv(): the recv() function of MAC class has been overridden. Here, recv() means an incoming packet from both physical layer and upper layer.
- send(): this function is called by recv() when it get a packet supposed to sending down. Similarly, a callback handler is given as a parameter. Immediately, the sendDATA(p) function is called to generate an appropriate mac_header for this packet, and set this to pktTx_. Then, follew the CSMA/CA procedures to get this packet sent.
- sendDATA(). to compose a DATA MAC frame and set it as pktTx_
- recvDATA(). When heard a DATA MAC frame, hand it to upper layer.
Callback to IFQ in MAC 802.11
The callback is set when a packet comes from upper layer and be handled by send(p,h). The callback is used and reset to zero in tx_resume() function of mac-802_11.cc:
void

Mac802_11::tx_resume()

{
.....The callback will reactivate the interface queue between mac_ and ll_ objects, see queue/queue.cc
else if(callback_) {
Handler *h = callback_;
callback_ = 0;
h->handle((Event*) 0);
}
// change wrt Mike's code
//SET_TX_STATE(MAC_IDLE);
setTxState(MAC_IDLE);
}
void QueueHandler::handle(Event*)See that the queue is blocked if not "callback", thus, callback is essential to make queue work properly.
{
queue_.resume();
}
void Queue::resume()
{
Packet* p = deque();
if (p != 0) {
target_->recv(p, &qh_);
} else {
if (unblock_on_resume_)
blocked_ = 0;
else
blocked_ = 1;
}
}
Backoff
The backoff implementation in mac-802_11.cc does not comply with the standard. Basically, this is due to the introduction of a defer timer. The defertimer is set in send() and after a packet transmission finishes. The deferred time value is usually (DIFS+rTime) where rTime is as same as the selection of backoff timeslots from CW (Contention Window). However, the defertimer is never paused or resumed.
So, after a packet transmission, according to the IEEE 802.11 standard, the node should do backoff immediately. here in ns-code, the defertime is first set. And after timer out, in check_pktTx() function. if the channel is not idle, a backoff timer is set. Therefore, here exists a double backoff problem. Also, according to IEEE 802.11 standard, a node should access channel directly if it sense the channel idle and still idle after at least DIFS time. Here, ns-code also deviates from the standard and add an additional rTime before sending DATA or RTS.
Determine the transmission time
txtime is calculated from the "size" variable in common header. Because all headers are present in the packet no matter what layer it is. Thus, the only way to know the packet size is to add or subtract some bytes in hdr_cmn->size(); In 802.11 MAC code, in recvDATA(), the 802.11 header size will be subtracted. And in SendDATA(), a 80211_hdr_length will be added.
Transmission Failure:
In both RetransmitRTS and RetransmitDATA functions, it is necessary to deal a packet drop :
if(ssrc_ >= macmib_.getShortRetryLimit()) {

		discard(pktRTS_, DROP_MAC_RETRY_COUNT_EXCEEDED); pktRTS_ = 0;

		/* tell the callback the send operation failed

		   before discarding the packet */

		hdr_cmn *ch = HDR_CMN(pktTx_);

		if (ch->xmit_failure_) {

                        /*

                         *  Need to remove the MAC header so that

                         *  re-cycled packets don't keep getting

                         *  bigger.

                         */

			// change wrt Mike's code

                        //ch->size() -= ETHER_HDR_LEN11;

			ch->size() -= phymib_.getHdrLen11();

                        ch->xmit_reason_ = XMIT_REASON_RTS;

                        ch->xmit_failure_(pktTx_->copy(),

                                          ch->xmit_failure_data_);

                                               //callback by upperlayer
                }
		//printf("(%d)....discarding RTS:%x\n",index_,pktRTS_);
		discard(pktTx_, DROP_MAC_RETRY_COUNT_EXCEEDED); pktTx_ = 0;
		ssrc_ = 0;
		rst_cw();
	}
So, it is a way to let upper layer , such as DSR routing to know there is a route-error and need to send a route-error message.
Frame Formats in ns-2
The 802.11 header in ns-2 is not conform to the 802.11 standard. It is a different one. Thus, this overhead cannot be regarded as authentic as that of
the experiment. And the throughput measurements also seems different.
Other IEEE 802.11 features
1. Carrier SenseThis is normally done by the physical layer source code. The state of 802.11 MAC is controlled by some timers. Such as the Backoff_timer. By checking if those timers are still busy, the MAC will arrange its operations correspondingly.
2. Virtual Carrier Sense
RTS/CTS is an important part of code. There are functions like sendRTS ( is to form a RTS ctrl packrt) , retransmitRTS...... Basically it has to compare with RTSThreshold first, if the size is small than the threshold, there is no" virtual carrier sense" scheme used.
'Network > Ns2_Lecture' 카테고리의 다른 글
| ns2에 대한 17가지 질문 (0) | 2009.02.08 |
|---|---|
| [통신관련] XP인터넷 최적화 총정리 (MTU 측정에서 변경까지) (0) | 2009.01.18 |
| Tcl 명령어 (0) | 2009.01.18 |
| 라우팅 모듈 (0) | 2009.01.18 |
| The Network Simulator - ns-2 (0) | 2009.01.18 |
Quick Reference 카드가 필요한가? 여기서 선택해보자

1.Linux Command Line Tips
리눅스에서 일반적인 명령을 내릴때 참고할만한 "linux command line reference"(HTML Format)
2.Unix/Linux Reference Card
Unix/Linux Command Reference Card. (PDF format)
3.One Page LInux Manual
유용한 linux command 요약 (PDF format)
4.Linux Security Quick Reference
이 Quick Reference Guide는 당신의 시스템의 보안 향상을 위해서 A-Z까지 나와있다. (PDF format)
5.Screen VT100/ANSI Terminal Emulator Cheat Sheet
이 cheat-sheet는 screen command에 대한 모든 기본적인 keboard mapping에 대해서 정리되어있다. (PDF format)

6.Vi/VIM Graphical Cheat-Sheet
이 문서는 vi/vim 입력 모델, 모든 기능의 키들, 모든 중요한 요소를 하나의 페이씩 구성되어있다. 마치 압축된 vi/vim 메뉴얼과 같이 느껴진다.(GIF format)
|
|
|
| ||||||||
|
|
|
|
7.Firefox Keyboard and Mouse Shortcuts
FireFox의 키보드와 마우스 단축키가 OS마다 정리되어있다. (HTML format)
8.Gimp Reference Card
Designed for Gimp version 1.2.2. (PDF format)
9.Debian Reference Card
The 101 most important things when using Debian GNU/Linux (last revision 2005-09-03). (PDF format)
10.Google Cheat Sheet
두 페이지로 구성된 Google Cheat Sheet 는 모든 Google Service와 Tool들을 배경설명과 함께 나열하고 있다. Google검색 쿼리의 구조와 기초부터 완성까지 정리된 훌륭한 참고자료이다. (PDF format)
다른 유용한 Cheat-sheet들 ( Peteris great site ): www.catonmat.net
See also: www.cheat-sheet.org and www.techcheatsheets.com
[출처] 10가지 리눅스 사용자에게 꼭 필요한 Cheat-Sheet|작성자 황제펭귄
'Computer_language > Linux' 카테고리의 다른 글
| [Ubuntu] vncserver init.d script (0) | 2009.01.20 |
|---|---|
| ubuntu에서 vnc 사용하기Network/Linux (0) | 2009.01.20 |
| .bashrc for ns2 in ubuntu (0) | 2009.01.19 |
| 우분투 /etc/apt/ 업데이트 파일 (0) | 2009.01.19 |
| 우분투에서 사용하는 명령어 (0) | 2009.01.16 |
이번에 OpenSUSE 11.0 으로 업그레이드하면서 이상한 현상이 발생하였습니다.
10.3에서 잘돌던 프로그램이 11.0으로 오면서 CPU 가 150% 이상 점유하는 문제였습니다.
그래서 결국에 문제를 찾기위해서 프로그램을 디버그해보았습니다.
문제가 생긴 부분은 thread에서 cpu점유를 막기위해서 사용한 usleep의 문제였습니다.
usleep(10)이라 해서 10us 만 쉬도록 되어있던 코드가 문제였습니다.
일단 thread내에서 cpu 점유율을 낮추기 위해서 10us를 쉬도록 한것 자체가 성립되지 않는 문제입니다.
그 이유는 man usleep 을 해보면 자세히 나와있고 sleep에 얽힌 이야기들 이란 글에 잘 나와있습니다.
한 thread내에서 sleep등으로 context switching이 일어날 경우 다른 thread를
수행하고 다시 현재의 thread로 돌아오는 시간은 최소 > 10ms가
되며, 이것은 Intel Platform에서 지원하는 timer 주기와 맞물린다고 한다.
(이에 대해선 linux의 jiffies설정과 기타 문서 참조.)
따라서 실제로 thread내에서 usleep이든, nanosleep이든 sleep할 수 있는 최소의
시간은 >1/HZ(10ms intel)가 되어야하며, 이것은 1/100초 즉, 10msec라고 할 수 있다.
실제 sleep할 수 있는 시간은 10msec가 아닌 60msec정도가 한계인 경우(irix,solaris
혹은 linux)도 있다. 이것은 또한 사용자 레벨에서 줄 수 있는 최소의 sleep time이라
볼 수 있다.
usleep의 숫자를 늘린 뒤에는 (10ms이상으로) CPU 점유율이 정상적으로 돌아왔습니다.
glibc 소스를 받아서 10.3과 11.0의 usleep의 구현을 봐도 동일합니다.
(usleep 구현이 내부적으로 nanosleep을 호출하도록 되어있더군요. 구현이 틀리다는 내용도 있었는데 실제 보니.같았습니다.)
KLDP의 글에서 살짝이나마 예상을 할수 있었습니다.
usleep는 deprecated된 함수이고,
일반적으로 nanosleep을 사용하라고 권고하고 있습니다.
내부적으로 usleep은 select()함수를 이용하여 구현되었었다고
알고 있고, select를 직접 쓰시는 것과 큰 차이가 없습니다.
그리고, 한 쓰레드가 usleep을 한다고 해서 다른 쓰레드가 모두
정지하는 것이 아니고, 쓰레드의 스케쥴링 스코프가 SYSTEM
(BOUND Thread)일 경우에는 전혀 상관이 없습니다.
물론 PROCESS 스코프일 경우에도 SUN의 경우는 LWP Level을
자동으로 올려 그런 경우가 없도록 구현해 놓았습니다.
그리고, usleep이 Thread unsafe하다는 이야기는 처음 듣는
것이고, Thread unsafe한 함수의 경우 해당 플랫폼의
매뉴얼이나 Thread 프로그래밍 문서에 잘 나와있습니다.
(Signal Unsafe한 경우도 고려해야 합니다.)
nanosleep의 경우 사실상 CPU를 적게쓰기 위해 호출하는
것은 적절하지 않다는 생각이 듭니다.
문맥교환의 기본 시간단위가 mili second인데 nano second
단위로 Sleep을 하려면 CPU를 소모하면서 busy wait을
한 이후에 깨어나는 수 밖에는 없어서 그렇습니다.
개인적으로 테스트해 본 결과, select()보다 nanosleep()의 경우
CPU를 때때로 더 많이 사용하는 경우를 맞닥드린 경우도
있습니다. (물론 개인적인 테스트이기 때문에 편차가 있을 것으로
생각합니다만)
만일 CPU 점유율을 낮추기 위해 sleep을 하시려면
제가 보기에는 select() 관련 함수가 가장 적합해 보입니다.
좋은 결과 있기 바랍니다.
좀 오래된 글이라 (2003년) 안 맞는 이야기가있긴합니다.(usleep은 deprecated되었다 라던지. usleep구현이 틀리다. 현재 glibc 소스를 보면 usleep내부적으로 nanosleep로 되어있습니다.)
위의 내용에서 u sec의 수준으로 sleep을 하는 경우에 CPU를 소모하면서 busy wait를 한다고 되어있습니다.
아마 이게 주 원인이 아닐까 싶습니다.
결론적으로 thread내의 usleep의 10ms 이하의 sleep은 의미가 없고 OpenSUSE 11.0에서는 더 많은 cpu를 사용하는
문제가 생깁니다.
ps: 아직까지 11.0의 무엇이 이 원인을 생기게 했는지는 모르겠습니다. 누구 아시는 분은 좀 알려주세요.
추가의 글..
nanosleep의 manual을 보면 최소의 resolution은 1HZ라고 되어있습니다.
BUGS
The current implementation of nanosleep() is based on the normal kernel timer mechanism, which has a resolution of 1/HZ s (see time(7)). Therefore, nanosleep() pauses always for at least the
specified time, however it can take up to 10 ms longer than specified until the process becomes runnable again. For the same reason, the value returned in case of a delivered signal in *rem is
usually rounded to the next larger multiple of 1/HZ s.Old behavior
In order to support applications requiring much more precise pauses (e.g., in order to control some time-critical hardware), nanosleep() would handle pauses of up to 2 ms by busy waiting with
microsecond precision when called from a process scheduled under a real-time policy like SCHED_FIFO or SCHED_RR. This special extension was removed in kernel 2.5.39, hence is still present in
current 2.4 kernels, but not in 2.6 kernels.In Linux 2.4, if nanosleep() is stopped by a signal (e.g., SIGTSTP), then the call fails with the error EINTR after the process is resumed by a SIGCONT signal. If the system call is subse-
quently restarted, then the time that the process spent in the stopped state is not counted against the sleep interval.
man 7 time을 해보면 다음과 같은 글이 있습니다.
The Software Clock, HZ, and Jiffies
The accuracy of many system calls and timestamps is limited by the resolution of the software clock, a clock maintained by the kernel which measures time in jiffies. The size of a jiffy is
determined by the value of the kernel constant HZ. The value of HZ varies across kernel versions and hardware platforms. On i386 the situation is as follows: on kernels up to and including
2.4.x, HZ was 100, giving a jiffy value of 0.01 seconds; starting with 2.6.0, HZ was raised to 1000, giving a jiffy of 0.001 seconds; since kernel 2.6.13, the HZ value is a kernel configuration
parameter and can be 100, 250 (the default) or 1000, yielding a jiffies value of, respectively, 0.01, 0.004, or 0.001 seconds. Since kernel 2.6.20, a further frequency is available: 300, a num-
ber that divides evenly for the common video frame rates (PAL, 25 HZ; NTSC, 30 HZ).
위의 글들이 좀 오래된것이라 2001년 2003년.. 현재 상황과는 안 맞는 부분이 있습니다.
테스트 하나)
OpenSUSE 11.0과 OenSUSE 10.3에서 usleep(1)을 했을때 얼마 정도 지나야 깨어나는지 테스트해보았습니다.
#include <unistd.h>
#include <sys/time.h>
#include <stdio.h>int main()
{
struct timeval tv;gettimeofday(&tv,NULL);
printf("%d %d\n", tv.tv_sec, tv.tv_usec);
for(int i=0; i<10; i++)
{
usleep(1);
}
gettimeofday(&tv,NULL);
printf("%d %d\n", tv.tv_sec, tv.tv_usec);
}
OpenSUSE 10.3 (평균 7382us)
1215153330 337156
1215153330 415476
OpenSUSE 11.0(평균 9.4us)
1215153341 235090
1215153341 235184
보면 usleep의 resolution이 11.0이 상당히 높음을 알수 있습니다.
결국 OpenSUSE 11.0에서 usleep 을 사용하여 thread를 쉬게 한뒤에 넘겼을 경우에 빠른 시간내에 제어권을 가지고 오기 위해
CPU를 사용했다는것을 알수 있습니다.
[출처] Thread 내의 usleep 의 문제|작성자 황제펭귄
'Computer_language > C' 카테고리의 다른 글
| Select를 이용한 채팅 서버 (0) | 2009.01.12 |
|---|---|
| 소켓 주소 구조 (0) | 2009.01.12 |
| 포인터 far near huge (0) | 2009.01.12 |
| 바이트 오더(Byte Order)에 대해서... (0) | 2009.01.12 |
| [Transformation] htons [출처] [Transformation] htons|작성자 임종배 (0) | 2009.01.12 |
[컴][해킹] Reverse Engineering - 1
2008-06-06
참고로 java 의 reverse engineering tool 이 필요해서 잠깐 써먹었는데, 괜찮네~
http://steike.com/code/java-reverse-engineering/
여기 가면 download를 받을 수 있다.
혹시나 해서 여기에도 올려놔 본다. (jad.exe)
jad.exe
'Computer_language > Debug' 카테고리의 다른 글
| The Network Simulator ns-2: Debugging Tips (0) | 2009.01.18 |
|---|---|
| Debugging with DDD (1) | 2009.01.12 |
| [ns] Helpful Info regarding GDB / DDD and NS2 (0) | 2009.01.12 |
| gdb 사용법 (0) | 2009.01.12 |
| [ns] re:how to debug TCL (0) | 2009.01.12 |


